Planimeters didn't calculate in the sense of allowing a user to enter some numbers and producing a result. They did, however, solve a tedious and common problem - that of determining the area of some closed shape. In other words, these devices were integrating machines.
To use a planimeter, the user set up the device, zeroed the recording wheels and then traced the pointer all the way around a closed shape (typically a clockwise direction was used to produce a positive result.) The area could then be read directly off the dials. Better planimeters allowed adjustments to allow the device to read in various units and scales. Other units simply read in a fixed scale such as square centimeters and required the results to be scaled to the units required.
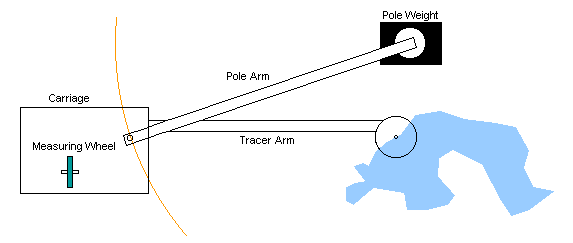
Planimeters were made in a number of ways. The devices shown below are Polar Planimeters. To use them, the user set pole weight on the desk usually outside the area to be measured. The pole weight sometimes had one or more pins in the bottom to make it stay put. The pole arm connected the pole weight to the carriage and the tracer arm connected the tracer point to the carriage. This caused the carriage to always move around a semi-circle regardless of the shape the tracer point followed.
Underneath the carriage was a measuring wheel. While the carriage always followed a circle, the angle of the tracer arm caused the measuring wheel to be anywhere between tangential to the circle and perpendicular. 
In the picture above, the carriage would always move about the orange circle as the tracer point was moved around the blue shape. Depending on the angle of the carriage and the direction of the tracer point movement, however, the movement of the green measuring wheel would consist of a combination of sliding and turning on its axis. Sliding would not affect the measurement dials at all but the turning would. With a couple of pages of calculus, it can be shown that the rotation of the wheel is proportional to the area traced.
An excellent java planimeter has been donated by Larry Leinweber. Please try it.
![]() Picture of a Filotecnica Salmoiraghi Polar Planimeter #236 (~48K) (Made in Italy)
Picture of a Filotecnica Salmoiraghi Polar Planimeter #236 (~48K) (Made in Italy)
![]() Closeup of the Filotecnica Salmoiraghi carriage (28K) From right to left across the bottom, the vernier, measuring wheel and dial allowed four digit results to be read. The lever below the dial was for zero setting.
Closeup of the Filotecnica Salmoiraghi carriage (28K) From right to left across the bottom, the vernier, measuring wheel and dial allowed four digit results to be read. The lever below the dial was for zero setting.
![]() Picture of a K&E Paragon Polar Planimeter #62 0015 (~54K) (Made in Germany)
Picture of a K&E Paragon Polar Planimeter #62 0015 (~54K) (Made in Germany)
![]() Picture of the K&E Planimeter in its box (~54K)
Picture of the K&E Planimeter in its box (~54K)
![]() Closeup of the K&E carriage (~23K) The wheel at the top supported the carriage and was not involved in measurements. From left to right across the bottom, the vernier, measuring wheel and dial allowed four digit results to be read. The yellow wheel further right was for zero setting.
Closeup of the K&E carriage (~23K) The wheel at the top supported the carriage and was not involved in measurements. From left to right across the bottom, the vernier, measuring wheel and dial allowed four digit results to be read. The yellow wheel further right was for zero setting.
![]() Closeup of the underside of the K&E carriage (~23K) The yellow plastic wheel was for zero setting (from the top) and did not touch the paper. The measuring wheel is the thin metal disk to the left of the scale wheel. The wheel near the top supported the carriage and was not involved in measurement.
Closeup of the underside of the K&E carriage (~23K) The yellow plastic wheel was for zero setting (from the top) and did not touch the paper. The measuring wheel is the thin metal disk to the left of the scale wheel. The wheel near the top supported the carriage and was not involved in measurement.
![]() Back to early models contents
Back to early models contents
![]() Go on to adding machines
Go on to adding machines
![]() Back to more slide rules
Back to more slide rules